It’s time to take the plunge by growing sweet potatoes in bags. Grow bags are an excellent solution for patio or small space gardeners. You can make your own potato bag and make a fun family project. While almost everyone loves sweet potatoes, not everyone has a spacious backyard for a sweet potato patch.
That’s where grow bags for sweet potatoes comes in.
Learning how to grow potatoes in a bag will provide a space-saving solution.
Discover how easy it is to grow sweet potatoes in a bag. From planting slips to harvesting and curing.
Here are the necessary steps to grow sweet potatoes ( Ipomoea batatas) in grow bags.
1.Choose the right Soil
Choose an all-purpose potting soil with nutrients or organic matter if growing in containers.
To prepare for planting, add compost and a small amount of fertilizer (low in nitrogen like a 5-10-10) to potting soil that is good for raised beds or containers and has a pH range of 5.6 to 6.5.
Soils with poor internal drainage are characterized by a high moisture content and poor aeration, which cause sweet potato roots to be large, misshapen, cracked, and rough skinned.
2.Choose the right location for placing your grow bags for sweet potatoes
Sweet potatoes thrive best when receiving at least six hours of daily sunlight but the foliage will be richer, more vibrant, and vigorous when planted in the sun.
3.Select the Right Variety
Select a variety of sweet potato that is ideal for growing in grow bags. Many gardeners reference ‘Portio Rico’ (also referred to as ‘Bush’ or ‘Vineless’) as an ideal variety for smaller gardens or containers.
Sweet potatoes are known for their sprawling habit, but this cultivar has short and compact vines
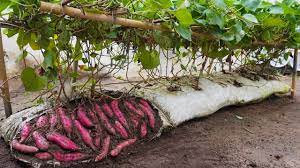
4.The best grow bags for sweet potatoes
Sweet potatoes require a wider grow bag which allow more room for slips to be planted, as compared to a taller grow bag that will hold less slips.
Start by flattening your bag’s bottom so it sits level on the ground.
Roll the bag’s top down until it’s around one foot tall.
Fill your bag with around 4” of potting soil mixed with straw to make a healthy growing environment for your potatoes.
Now it’s time to plant your sweet potatoes
5. Select Sweet Potato Slips for growing in grow bags
Sweet potatoes don’t grow from seeds but rather potato slips. Slips are the green vines growing out of sweet potatoes when they sprout.
They are planted to create new sweet potato plants.
One sprouting sweet potato can produce a minimum of 15 slips.
6. Planting of sweet potatoes slips
Place about four inches of soil in your container, then place the sweet potato slips on top and then add about three more inches of soil to secure them.
Once planted, make sure to water. Water frequency depends upon the type of container selected.
If using a Grow Bag, it is necessary to check the soil daily and water if it is dry.
Since the bag is porous, it causes the soil mix to dry out quickly.
If fertilizer was not included in your original mixture, two weeks after planting, add fertilizer.
As the stems grow upward, continue to add more soil mix until the level reaches the top of the grow bag. Sweet potatoes are ready to harvest typically four to five months after planting.
7.Storage and curing
After harvesting your potatoes leave them in a warm, humid place at 80°F for around 2 weeks. Doing this will allow the sweet potatoes to cure and encourage them to make a layer of suberin, a protective layer that helps extend their lifespan.
Storing sweet potatoes in a refrigerator will lead to an unpleasant taste and a hard center.
Instead, you can store whole sweet potatoes in a dark, cool, dry place (a basement or root cellar, for example) at 55-60° F.
Another thing you can do is to cut them into big pieces and put them raw in your freezer